Getting Started In LEGO Bricklink Studio
Select Bricklink’s Studio is a fantastic piece of software that gives you the ultimate brickpit. Where you can build existing LEGO sets or create the MOC of your dreams!
But it is a surprisingly complex program to use. So in this series of articles I’ll be giving you some tips and tricks on how to best utilise this program. Ok friends, let’s get into it!
If you haven’t downloaded a copy, simply head to stud.io and download whichever version suits your system. That means MAC or PC.
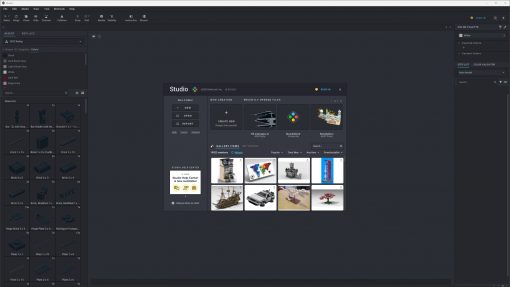
Starting up the program will show a splash screen which allows for creating a new file or opening up an existing model.
We also have an option to start the tutorial. This is a quick and fast way to get acquainted with basic building mechanics. You know, if you don’t want to read them on BrickBanter.com 😉.
If you accidentally skipped this, it can be found under the help -> welcome to studio menu. The splash screen will open, and you can press tutorial found under the import button.
A Quick Tour Of The Interface
![]()
When you start a new project you will see a blank workstage. But we are going to have a quick look at these buttons at the top. Most of these buttons have a shortcut.
With any of these buttons if you need to know more, just hold down Ctrl when clicking to open up a help menu.
![]()
Selection tools
The selection tools give you some ways to pick bricks and can be used to isolate bricks by colour or type.
Select – (V)
Used to select bricks. But a few nifty tricks are hiding here.
If you press on the small down arrow next to this you will get a few sub-selection tools.
Colour
This tool will select bricks of the same colour. Keep an eye out for an article coming soon about colours!
Type
Select any bricks of the same type, eg all 2×2 bricks.
Type and Colour
Will select any brick that matches the same part and colour.
Connected
Only select bricks that have a solid connection, for instance, things connected to a hinge.
Invert Selection
Reverse the order of selected bricks.
Adjustment tools
These tools will allow for bricks to be adjusted or modified in some shape or form.
Hinge (H)
Rotate a piece that’s connected. This can be a simple brick or something like a hinge.
Clone (C)
This will create a copy of the item that’s selected.
Hide (L)
Press this to hide individual bricks or sub-models. To un-hide, press Show All which appears in the top right of the workspace.
Connect
Allows for precise connection of a brick. When clicked all the connection points will appear as blue squares. To connect a piece you click to pair two squares together.
Collision
Will alert you if pieces will collide. They will turn transparent. I generally find modelling easier with this turned off.
Snapping tools
This series of tools is very useful when building as they adjust the sensitivity of how a brick snaps, or clicks to each other.
Grid – Determines how bricks will snap in place.
There are three main forms of placement, coarse, medium and fine.
Coarse will snap movement to a brick’s height and width.
Medium has a sub-position of plate height, where it will snap movement up and down to the height of a plate, which makes it easier to position parts.
Fine allows for fine-tuning and doesn’t snap to any grid coordinates.
Additional tools
These are other features of Studio
Render– Creates a photo-realistic render of your model. We will look at this in another article.
Stability – this aims to simulate the stability of a model and attempts to point out how strong the clutch power is on your build.
Instruction – Will open the instruction maker. Another tutorial will have a look at this feature.
Mosaic – will open the mosaic maker. Another tutorial will look at this feature.
This is only a quick runthrough of the basic features of Studio. Check in often to find more tips and tricks you can use to make the most of this program.
Be sure to follow us on socials for the next tutorial!
Thank you for reading
Support BrickBanter.com by shopping for your LEGO® via the affiliate links below.
It’ll cost you nothing but will mean the world to us. 🫶
🇦🇺 Australia – 🇨🇦 Canada – 🇪🇺 Europe – 🇬🇧 United Kingdom – 🇺🇸 United States – 💛 Everyone else
Explore more articles


BrickBanter.com is a recognized LEGO® Fan Media account.
Review sets are supplied by the LEGO group.